Persona 5 casino theme
Niijima's Palace
Also known as
Casino of Envy
Casino of Jealousy
Sis's Palace (by Makoto)
Japanese Name
ニイジマ・パレス
嫉妬の賭場
Rōmaji
Niijima Paresu
Shitto no Toba
Available
October 29 (Initial exploration)
October 30 (First day of free exploration) to November 19 (Final day to clear the Palace*)
Deadline
November 20 (Search warrant of the suspected Phantom Thieves)
—Akechi on Niijima's Palace, Persona 5
Niijima's Palace, also known as the Casino of Envy or the Casino of Jealousy, is a location in Persona 5. It is the Palace of Sae Niijima.
Appearances[]
Profile[]
Persona 5[]
At the beginning of the game, the protagonist is shown infiltrating a casino and when spotted by an apparently human security guard it transforms into a Shadow. When the protagonist tears off its mask, it erupts and takes the form of Moloch. The protagonist kills it and escapes by shattering a glass window, where the alarm set off and he was outnumbered and arrested by real police standing near the casino. He is then brought to the police station to be interrogated by Sae, where he testifies the events that form the majority of this game to her.
Later in the game, it is revealed to be the Palace of Sae Niijima, born from the pain of losing her father and her distorted disdain towards the current jurisdiction system. Sae was forced to become independent while supporting her younger sister, Makoto Niijima. In her profession, she faced much adversity from a corrupt political system and the need to be an agent of justice, forcing her to rig every case she is involved to her favor at all costs. The Phantom Thieves have to infiltrate it in order to prevent them from being framed for the murder of Kunikazu Okumura under the instructions of Goro Akechi. Unlike previous Palaces, all Cognitive existences in this Palace appear as normal people, as she does not think of others in a distorted manner. Just like during Futaba's Palace, the party does not instantly trigger their Metaverse clothing. Instead, the Metaverse clothing is triggered once they enter the Casino interior. This means that just like Futaba, Sae doesn't perceive the Phantom Thieves as threats, at least initially.
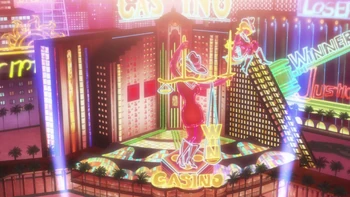
The Palace appears as a casino that is heavily rigged by complex rigging mechanisms in favor of the house, symbolizing Sae's desire to rig every case into her favor. It is guarded by Shadows resembling security guards holding champagne bottles and bunny girl waitresses. An LED bar on the top of the screen will display the number of coins the protagonist holds, as long as the party is within the Palace. Before the upper floors of the Palace can be reached, a member's card must be acquired in the basement area of the casino, a staff passageway filled with surveillance rooms. Breakable objects take the form of golden vases with poker symbols on top of them, and may contain small amounts of coins. After obtaining a member's card, 50,000 coins have to be earned to obtain a high limit card, which is impossible without neutralizing the rigging mechanisms. In order to neutralize the rigged mechanisms, additional staff passageways on the member's floor must be navigated. After this is done, the high limit floor is still reserved and is impossible to enter, so Akechi offers them to attend one of Sae's court cases so they can infiltrate it. 100 thousand coins are required to proceed to the manager's floor. The high limit floor features a house of darkness with no easily accessible exit along with an arena that only allows the protagonist to enter but constantly pits him against multiple enemies. When they made 100 thousand coins, Shadow Sae increases the number of coins required by tenfold in order to impede the party's progress, but Akechi secretly loaned that amount using a coin card that Futaba supposedly told him to throw away, allowing the party to locate the treasure in the manager's floor.
The Phantom Thieves send a calling card to Sae and she is instantly placed on standby. When they enter the Palace one last time, she fights them on top of the casino, at first challenging them to a rigged roulette, but when that was exposed, she transforms into Leviathan and directly attacks them, but was defeated. The party successfully persuades Shadow Sae to assist them, but hordes of real policemen appear in the Palace and the protagonist uses himself as bait to be arrested while his teammates formulate a plan to expose Akechi and get around him.
In Royal, before the protagonist reaches the end of the escape route, he will be surrounded by Shadows, but is saved by Kasumi Yoshizawa, who had followed the Phantom Thieves into the Palace without being noticed. The duo defeats all surrounding Shadows and the protagonist escapes the Palace in the same way as during the original game scenario.
In reality, the protagonist has purposefully let himself captured as a part of an extensive plan among his party to avert the attention of the Police; he only didn't remember it because he was drugged. Back to the present, Sae will ask the protagonist questions about the identities of his party members and confidants, where he might choose to sell them out, or deny the connections. If he denies his connections with them, the protagonist stalls Sae long enough for her to be instructed by him to show his bugged phone to Akechi and secretly puts him into the Palace, where he assassinates a cognitive copy of the protagonist instead. If the plan pulls off, the news will broadcast the protagonist's death and capture, putting the other Phantom Thieves into a temporary state of despair until Ryuji puts a grin on his face while saying "we've got'em" with glee, implying the plan to trick the Conspiracy has got through. With the protagonist's death averted, Sae transports him to Café Leblanc where they expose Shido as the mastermind.
If the infiltration route to the Treasure is not secured by November 18th, on the 20th, as with the deadline for Okumura, the police will come to arrest the protagonist after receiving an anonymous tip saying that he is the leader of the Phantom Thieves. This is a false recollection as a result of the drugs administered by the police, and, Sae will leave the interrogation room for the protagonist to recover, before Akechi assassinates him.
If the protagonist sold out his teammates or confidants in the interrogation room, in return for reducing his penalty, and has confirmed that he has made the right choices, Sae will promise him that she will do so, but Akechi appears in the interrogation room and executes his plan successfully. After a scene where the police believe the protagonist committed suicide, as seen if the deadlines for the first six palaces were missed, the protagonist is imprisoned in the Velvet Room for eternity by Igor, who states he has overestimated him and that he will spend the rest of his life in his cell to repent for his actions, which the twin wardens condemn him for.
Walkthrough[]
- Lockpicks needed: 3
- Note: If one wishes to save money at the Airsoft Shop, the armor with the highest defense rating available for Morgana at this point in the shop is in one of the locked chests in the Palace. The second best weapon for the protagonist is also available from a normal chest.
The party begins the initial exploration of Sae Niijima's Palace on October 29th. Following the meeting at the entrance, head forward and to the right to climb the stairs. Jump across the roof and enter the door along the path.
Once inside the interior of the Palace, the Phantom Thieves' clothes will change and a short scene will commence. Afterward, jump across the fixtures to the southeast end of an area to reach an air duct to crawl through. After reaching the other side, the party will be confronted by Shadow Sae, who will want them to speak with them. Shadow Sae will tell the party where the treasure is during the conversation, and then leave via an elevator. From here, the party must find their way up to her again.
There is a Treasure Chest at the southeast end of this area that contains a Feng Shui Charm along with a Safe Room on the south side of the room, across from the elevator. Interacting with the elevator will reveal that a members card is needed to use it. Following this, a Shadow will appear to challenge the party, and Akechi will show off his Persona in battle. Afterward, the party will leave the Palace. Before interacting with the elevator though, there is a Safe Room directly facing the elevator which the party can immediately fast-travel to upon revisiting.
The party can begin unrestricted exploration of Niijima's Palace on the following day. Once inside, head back to the room with the elevator. There will be Shadows patrolling the floor now. The party should head for the door at the southwest corner of the area next to enter the Staff Passageway.
Staff Passageway[]
Go through the door and follow the corridor as it heads to the north and then through some obstacles to the east to reach a Treasure Chest containing the Heaven Ring accessory in the northeast corner. Now follow the corridor to the west. Near the southeast end of the floor, the party will notice a locked door that requires a keycard to proceed through. A door just north of this leads into a room with another Treasure Chest containing Seedy Gear. Head directly north to reach another Safe Room. To the south and to the east from here and up the stairs is a glowing red Shadow. The party can approach it directly or climb the containers to the north and enter an air duct to bypass it for now. If the party chooses to open the door behind it from the other end, they will ambush the Shadow to initiate the battle. The Shadow will need to be dealt with in order to obtain its Security Keycard, however. From here, the party can head to the barred door they passed to the southwest to unlock it and collect some breakable object items or continue onwards.
Following the passage north, the party comes across a door being guarded by two Shadows. The party can either attack them head on or find another way. The Security Keycard will also unlock the door before them, allowing access to an air duct that leads into the room they're guarding. Inside the room is another large red Shadow and computer systems. Defeating the Shadow will make it drop a Member's Card, which Futaba will initialize at the terminals for use. She will also produce a Casino Map which reveals more of the area. The party can either take the new air vent out or unlock one of the main doors out to the hallway again. The two Shadows that were guarding the door will be gone.
A room to the south in the hallway only leads to a surveillance room where guests are monitored and no items. Follow the hallway to the northeast to proceed. The locked door at the end of the hallway leads back to the upper area of the main casino floor. Save at the Safe Room and use the main elevator to reach the next area.
Members Floor Lobby[]
The first door to the southwest leads into a new Safe Room for the party to use. Now speak to the cashier at the south end of the area. The party will receive a Members Floor Map and be informed that the card for the next area is a prize available for 50,000 coins. From here, they can decide which area to enter next. Heading southeast takes the party into the dice game area.
Dice Game Area[]
Head north to find an open air duct which leads into another Staff Passageway.
Staff Passageway[]
Head to the room with the yellow door in the middle of the area on the map to find a Treasure Chest that contains a Black Robe. Now take the stairs at the north end of the area and follow the hallway down some stairs to the next section of the area. Follow the hall on the lower floor and stay south to find another Safe Room. The stairs to the north only lead to a long hallway with a couple of breakable objects, so keep south and go through the door at the end of the hallway. Continue following the next hallway to find a barred door with no card reader. There is an air duct to enter the room on the opposite side. The Treasure Chest in this room contains a Parrying Dagger for the protagonist. The door at the end of the hall leads to the back rooms of the Dice Game Area.
Dice Game Area[]
Heading straight ahead will put the party into a battle with the Wandering Reviver, Nebiros. Nebiros can use Brain Jack to Frenzy the majority of the party, try to heal this as soon as possible. Following the battle, the party will rig one of the game rooms in their favor, while all the others will have fair odds. Head for the room marked with the exclamation point. Regardless of the option chosen, all dice rolls will have their numbers match (three 6es), which grants players automatic victory. Not head back towards the entrance of the Dice Game Area and a cutscene will play, resulting in the party obtaining even more coins. Now the party plans to enter the Slots Room.
Slot Room[]
The party will be forced into a battle with the Life-draining Spirit Kumbhanda upon entering the Slot Room. They will try to use Wage War to infuriate the party before attacking them with Physical attacks. After they are defeated, move forward into the area. There is a control terminal on the left that glows blue using Third Eye. Inspect it to have it marked on the map. Now head north and through the door. Follow the long hallway up the stairs until it descends down some stairs to the east and head into the caged room. There is another control terminal here that will be marked on the map.
Heading back to the branch split at the start of the area, take the staircase up next to the sealed door. Follow the upstairs hallway around and back down, then head south and east through the door to find a Treasure Chest containing Smokestained Armor behind some large crates. There is also a control panel here that will be marked on the map. Now follow the hallway back north and to the east to unlock the sealed door and mark another control terminal on the map. Now head into the western door to reach the main hall of the Slot Room. Move to examine the large slot machine at the west end of the area.
The party can find a Treasure Chest on top of some slot machines at the south side of the upstairs area containing a Ghillie Vest. On the north side is a control terminal that the party needs to access to proceed forward. Futaba will state the party will need to find a red and green control terminal. The red control terminal is the one near the entrance to the slot room. The green control panel is where the treasure chest behind the large crates was at the south end of the central area. From here, the protagonist can choose to head straight to the giant slot machine or explore the area more. The area contains 8 playable slot machines that comes with a minigame, which allows the party to gamble and win some more coins if lucky, but they will eventually run out of coins and become unusable.
At the giant slot machine, the party will win the required coins and be given the option to head straight for the lobby to redeem them or explore the area more. The party must redeem 50,000 coins for the High Limit Card to proceed further into the Palace. After purchasing the card, there will be a Shadow guarding the elevator entrance. Save at the Safe Room, then challenge them to proceed. The party will face the Final Measurer, Norn.
Upon reaching the High Limit Floor, the party will be forced to leave until they make Sae recognize their "reservation" by being allowed into a court room during proceedings with her. Leave the Palace for the real world when ready.
After the court room scene occuring in the following day, the party will head directly to the Palace. Go up to the High Limit Floor.
High Limit Lobby[]
Check in at the front desk to receive 1,000 coins and the High Limit Floor Map. Then head to the door indicated in the cutscene. Investigate the scale bridge and authentication device nearby to learn that the Bridge of Judgment must be activated by 100,000 coins. Open the nearby Locked Chest to receive a Bead Chain and Sapphire, then head back down into the lobby. There is a new Safe Room at the far north end of the area. Save and then continue onward.
House of Darkness[]
The door to the east leads into the Battle Arena, but there's an entrance fee of 10,000 coins. This leaves the House of Darkness to the west as the only available route open to the party at the moment. The entrance fee is 1,000 coins, with a 10,000 coin payout. Pop into the Safe Room immediately to the south after the introduction scene, then continue onward.
Once inside, the hallways will be nearly pitch black with Shadows roaming about. If the party is spotted by a Shadow, a spotlight will light up the area just light enough to strike them without being blindsided. The minimap will not display the hallways' layout as the party moves around. There is only one hallway leading to a locked door. After a short scene, the party can enter an air duct to proceed forward. After dropping down, a door immediately to the south leads two a long hallway with two patrolling Shadows and a Treasure Chest containing a Fortress Belt. Now head back to the dropdown area and follow the hall until it splits into two paths. The lefthand path leads into a room containing a Treasure Chest with a Balm of Life inside. The righthand path eventually leads into another room with a barred door and a lit fixture to climb onto.
Climbing onto the fixture leads into an air vent. Once out of the air vent, a door to the north leads to a long hallway with a split. The righthand path here leads to the locked door that was next to the original air vent in the area. The lefthand path leads to a room with a Treasure Chest containing a Model Gun.
Going back to the split at the air vent, the western door leads into a lit area with a Locked Chest containing a Morose Collar, Topaz and Magic Ointment. The door to the southeast leads back into the darkened maze, near the lit climbable fixture. The door to the west leads into a long hallway, where a Shadow will block the way forward, making it necessary to find an alternate route.
The door immediately visible to the south is barred from the other side, making it necessary to crawl through a nearby air vent further down on the same wall. After going through, unlock the door if desired, then follow the hallway through to the exit door. The hallway is one relatively straightforward path, with jumps up and down to skip some parts of the route. There is a Locked Chest in this hallway that contains a Soma and Sapphire. Once through the hallway, the protagonist can interact with a keypad on the opposite wall to retract the wall of cards in the hallway. Afterward, proceed west through the next door.
Following the hallway west, the Shadow from earlier can be seen waiting at the end of the area. The party can divert into a Safe Room to the south before engaging them without a issue. Save the game and meet the Shadow. The Shadow will transform into the Snake King, Raja Naga, upon being confronted by the party. Raja Naga will alternate between using Concentrate and Mazionga to attack the party. After the Shadow is defeated, the party can skip back to the lobby area or explore the area more. There is one breakable object in the encounter area where the Shadow was, but otherwise, there is nothing else at the end of the area.
Battle Arena[]
Back in the High Limit Lobby, head for the Battle Arena doors. In the Battle Arena area, there is a new Safe Room to save at. Now check in at the front counter to have the protagonist enter "one-on-one" battles in the arena. Once ready, interact with the gate and proceed forward into the arena area from the hallway.
The first battle will be against two Auspicious Pachyderms. Psy skills will upend them for extra turns. The second battle will be against three Dancing Witches. Electricity and Bless skills will hit their weakness, but they cannot be targeted by Physical, Gun, Fire or Curse skills; the former two will repel damage back at the protagonist.
The last battle will be against the Thunder Emperor, Thor. Thor will alternate by using Charge and Concentrate skills, with an extra turn between each to prepare for his attack. Switching to a Persona that will Repel Physical and letting the protagonist take the hit will inflict a great deal of damage on Thor. Personas that Repel Electricity will have no additional effect, as Thor will Nullify the counter damage. Girimehkala and Rangda can be used to Repel the Physical damage, but Rangda is weak to Electricity attacks.
After the battle, the party will receive the 100,000 coin payout and be able to activate the Bridge of Judgment to reach the next area. Following a scene where Shadow Sae attempts to deny their progress again, the party will outsmart her thanks to Akechi's planning, being able to lower the bridge despite Shadow Sae's amended requirement of 1,000,000 coins. After lowering the bridge, the party can continue forward. Additionally, there are some items available at the High Limit Lobby counter if the protagonist wishes to purchase them. The desk has a Golden Beam weapon for Akechi (1,200 coins), Tyche Charm accessory (400 coins) and Despair Charm accessory (400 coins) available for purchase. The protagonist can also backtrack to the Members Floor Lobby to purchase a Soma (350 coins) and Bead Chain (120 coins).
Once the path to the Treasure has been secured, the party can opt to leave the Palace or continue exploring. There is nothing else in the room with the Treasure and the door at the top of the stairs is locked. Once ready with any necessary preparations, leave the Palace when desired.
The Calling Card will automatically be sent on November 18th, leaving the protagonist free to do what they wish until then. Upon returning to the Palace, head to where the treasure was located. A door will unlock leading upstairs to another elevator. The protagonist will be prompted to confirm using it to go upwards, as this leads to the boss encounter.
After the boss encounter, the protagonist is required to escape the Palace alone and will fight the Moloch Shadow seen at the tutorial of the game at the end of the catwalk. Once he defeats it, a cutscene will play and a prompt to save the game will appear. Save the game as the upcoming interrogation events might lead to a bad ending if the wrong choices are made.
Treasure[]
The true form of Shadow Sae's Treasure is never shown in reality. Before the Treasure is materialized in the Metaverse, Makoto expects its true form to be their father's investigation notebook, symbolizing Sae's grudge over their father's death in the line of duty. It was never stolen, so Sae and her Shadow can be used to outmaneuver Akechi. In order to further the Phantom Thieves' plans, Ryuji hands over an empty suitcase to the protagonist in order to trick Akechi into believing that they are genuinely reforming Sae's heart. In the animation, the suitcase contains this police notebook.
Equipment[]
Upgraded equipment that becomes available once Niijima's Palace becomes accessible.
Persona 5[]
| Weapon | User | Attack | Accuracy | Effect | Location |
|---|---|---|---|---|---|
| Parrying Dagger | Protagonist | 184 | 96 | Ag+2 | Airsoft Shop (¥28,800) |
| Machete | 204 | 98 | - | Airsoft Shop (¥30,400) | |
| Damascus Sword | Morgana | 180 | 94 | - | Airsoft Shop (¥29,400) |
| Heavy Saber | 200 | 96 | - | Airsoft Shop (¥31,200) | |
| Gaea Presser | Ryuji | 186 | 92 | - | Airsoft Shop (¥29,400) |
| Big Sleep Stick | 200 | 88 | +Sleep (med) | Airsoft Shop (¥31,400) | |
| Strike Tail | Ann | 178 | 94 | - | Airsoft Shop (¥27,200) |
| Great Whip Sword | 198 | 96 | - | Airsoft Shop (¥28,600) | |
| Snow Queen's Whip | 210 | 90 | +Auto-Sukukaja | Itemize Skadi using Black Kogatana | |
| Iai Katana | Yusuke | 190 | 94 | - | Airsoft Shop (¥30,000) |
| Orochito | 210 | 96 | +Dizzy (low) | Airsoft Shop (¥31,800) | |
| Mach Punch | Makoto | 178 | 88 | Ag+3 | Airsoft Shop (¥27,400) |
| Bear Gloves | 200 | 90 | +Critical Rate up (med) | Itemize Bugs using Black Kogatana | |
| Demon Fist | 204 | 96 | - | Airsoft Shop (¥28,600) | |
| Mega Axe | Haru | 188 | 90 | - | Airsoft Shop (¥34,600) |
| Crescent Axe | 208 | 92 | - | Airsoft Shop (¥36,600) | |
| Lumina Saber | Akechi | 200 | 96 | - | Default Airsoft Shop (¥31,800) |
| Quasar Saber | 222 | 92 | - | Airsoft Shop (¥33,800) |
| Weapon | User | Attack | Accuracy | Rounds | Effect | Location |
|---|---|---|---|---|---|---|
| Sleeper | Protagonist | 214 | 88 | 8 | - | Airsoft Shop (¥32,600) |
| From Heaven | 236 | 92 | 8 | - | Airsoft Shop (¥33,600) | |
| Intercept | Morgana | 216 | 90 | 5 | - | Airsoft Shop (¥27,200) |
| Star Slayer | 246 | 98 | 5 | - | Airsoft Shop (¥32,00) | |
| Orso Nero | Ryuji | 218 | 86 | 4 | - | Airsoft Shop (¥32,600) |
| Fury | 248 | 94 | 4 | +Rage (low) | Airsoft Shop (¥38,400) | |
| Western SMG | Ann | 212 | 78 | 12 | - | Airsoft Shop (¥30,800) |
| Tempest | Yusuke | 216 | 82 | 12 | - | Airsoft Shop (¥36,200) |
| AR-X | 230 | 94 | 12 | - | Airsoft Shop (¥38,000) | |
| Evil Roulette | Makoto | 226 | 94 | 6 | +Random Ailment (low) | Airsoft Shop (¥32,200) |
| Baptism | 244 | 94 | 6 | - | Airsoft Shop (¥36,200) | |
| Multiple GL | Haru | 196 | 86 | 1 | - | Airsoft Shop (¥38,000) |
| Town Burner | 214 | 86 | 1 | - | Airsoft Shop (¥42,600) | |
| Moebius | Akechi | 234 | 90 | 6 | - | Default Airsoft Shop (¥36,200) |
| Sirius | 256 | 94 | 6 | - | Airsoft Shop (¥37,200) | |
| Golden Beam | 266 | 88 | 6 | +Despair (med) | Niijima's Palace High Limit Prize Desk (1,200 coins) |
| Armor | User | Defense | Evasion | Effect | Location |
|---|---|---|---|---|---|
| Seedy Gear | - | 10 | 1 | - | Chest - Niijima's Palace, Staff Passageway |
| Smokestained Armor | - | 10 | 1 | - | Chest - Niijima's Palace, Slot Room |
| Ghillie Vest | Unisex | 149 | 8 | +Evade Physical (low) | Locked Chest - Mementos, Akzeriyyuth Airsoft Shop (¥32,000) Chest - Niijima's Palace, Slot Room |
| Rune Dress | Female | 156 | 13 | Ma+3 | Locked Chest - Mementos, Akzeriyyuth Chest - Mementos, Adyeshach Airsoft Shop (¥32,800) |
| Measure Collar | Cat | 161 | 19 | Lu+5 | Locked Chest - Mementos, Akzeriyyuth Chest - Mementos, Adyeshach Airsoft Shop (¥30,800) |
| Egoist Shirt | Unisex | 167 | 9 | +Resist Brainwash | Airsoft Shop (¥33,800) |
| Fluted Guard | Male | 172 | 11 | Ag+3 | Locked Chest - Mementos, Akzeriyyuth Chest - Mementos, Adyeshach Airsoft Shop (¥33,400) |
| Unyielding Vest | Unisex | 173 | 13 | Lu+5 | Wash Seedy Gear |
| Yama Dress | Female | 174 | 14 | +Evade Curse (med) | Airsoft Shop (¥34,400) |
| Life Jacket | Unisex | 179 | 9 | +20HP | Locked Chest - Mementos, Adyeshach |
| Morose Collar | Cat | 180 | 20 | +Resist Rage | Airsoft Shop (¥32,400) Locked Chest - Niijima's Palace, House of Darkness |
| Tsubofuri Wrap | Female | 182 | 20 | En+5 | Wash Seedy Gear |
| Kotodama Cape | Female | 187 | 14 | +Resist Brainwash | Locked Chest - Mementos, Adyeshach |
| Scam Collar | Cat | 188 | 25 | Lu+5 | Wash Seedy Gear |
| Brave Waistcoat | Male | 192 | 12 | +Resist Fear | Airsoft Shop (¥35,200) |
| Gambler Shirt | Unisex | 193 | 14 | +Resist Despair | Wash Smokestained Armor |
| Gambler Guard | Male | 201 | 17 | +Evade Physical (low) | Wash Seedy Gear |
| Gambler Dress | Female | 202 | 21 | +Evade Curse (high) | Wash Smokestained Armor |
| Gambler Collar | Cat | 210 | 26 | Lu+5 | Wash Smokestained Armor |
| Black Wing Robe | Unisex | 220 | 20 | +Reduce Nuke dmg (low) | Itemize Yatagarasu using Black Robe |
| Lucky Waistcoat | Male | 223 | 18 | +Resist Fear | Wash Smokestained Armor |
| Accessory | Effect | Location |
|---|---|---|
| Spirit Belt | +Reduce Physical dmg (low) | Airsoft Shop (¥30,000) |
| Resist Ring | +Reduce Magic dmg (low) | Airsoft Shop (¥50,000) |
| Orlov | Ma+3/+Repel Physical (high) | Itemize Orlov using Black Rock |
| Fortress Belt | En+3 | Chest - Niijima's Palace, House of Darkness |
| Feng Shui Charm | Lu+3 | Chest - Niijima's Palace, Main Floor |
| Wizard Amulet | Ma+5 | Locked Chest - Mementos, Adyeshach |
| Tyche Charm | Lu+10 | Niijima's Palace, High Limit Prize Desk (400 coins) |
| Heaven Ring | +Reduce Bless dmg (med) | Chest - Niijima's Palace, Staff Passageway |
| Despair Charm | +Null Despair | Chest - Niijima's Palace, High Limit Prize Desk (400 coins) |
| Daffodils | +Null Despair | Itemize Narcissus using Black Rock |
| Hachiman Belt | +Reduce Physical dmg (high) | Home Shopping Channel 11/6 (¥9,800) |
| Druj Ring | +Reduce Curse dmg (high) | Locked Chest - Mementos, Adyeshach |
Persona 5 Royal[]
| Weapon | User | Attack | Accuracy | Effect | Location |
|---|---|---|---|---|---|
| Parrying Dagger | Protagonist | 184 | 96 | Ag+2 | Untouchable (¥29,300) |
| Machete | 204 | 98 | - | Untouchable (¥32,200) | |
| Royal Dagger | 210 | 98 | Lu+5 | Locked chest - High Limit Lobby | |
| Damascus Sword | Morgana | 178 | 97 | - | Untouchable (¥27,700) |
| Hot-Blooded Sword | 190 | 90 | Med Burn | Trade two Gear Girimehkala to Trader Sakai in Kichijoji (10/16 - 10/22) | |
| Heavy Saber | 198 | 99 | - | Untouchable (¥32,800) | |
| Big Sleep Stick | Ryuji | 188 | 91 | Med Sleep | Untouchable (¥29,900) |
| Gaea Presser | 208 | 93 | - | Untouchable (¥32,800) | |
| Strike Tail | Ann | 180 | 97 | St+3 | Untouchable (¥27,500) |
| Great Whip Sword | 200 | 99 | - | Untouchable (¥30,300) | |
| Snow Queen's Whip | 260 | 90 | +Auto-Sukukaja | Electric Chair Execution - Skadi | |
| Snow Queen's Whip II | 280 | 90 | +Auto-Sukukaja | Electric Chair Execution - Skadi(fusion alarm) | |
| Orochito | Yusuke | 190 | 94 | Low Dizzy | Untouchable (¥30,500) |
| Iai Katana | 210 | 96 | - | Untouchable (¥33,500) | |
| Mach Punch | Makoto | 184 | 94 | Ag+3 | Untouchable (¥27,500) |
| Demon Fist | 204 | 96 | - | Untouchable (¥30,300) | |
| Baccarat Knuckle | 210 | 96 | - | Locked chest - Staff-Only Room | |
| Bear Gloves | 240 | 90 | +Critical Rate up (med) | Electric Chair Execution - Bugs | |
| Big Bear Gloves | 260 | 90 | +Critical Rate up (med) | Electric Chair Execution - Bugs(fusion alarm) | |
| Mega Axe | Haru | 189 | 90 | St+3 | Untouchable (¥30,500) |
| Crescent Axe | 209 | 92 | - | Untouchable (¥33,500) | |
| Lumina Saber | Akechi | 184 | 96 | - | Untouchable (¥28,800) |
| Quasar Saber | 204 | 98 | - | Untouchable (¥34,100) | |
| Victory Beam | 210 | 98 | Lu+10 | High Limit prize desk (1,200 coins) |
| Armor | User | Defense | Evasion | Effect | Location |
|---|---|---|---|---|---|
| Rune Vest | Unisex | 153 | 8 | +Evade Curse (low) | Untouchable (¥28,100) |
| Yama Dress | Females | 156 | 13 | +Resist Fear | Untouchable (¥31,100) |
| Brave Scarf | Cats | 161 | 19 | +Resist Fear | Untouchable (¥29,200) |
| Formal Shirt | Males | 168 | 23 | - | Akechi default |
| Austere Haori | Males | 172 | 11 | +Resist Dizzy | Untouchable (¥31,700) |
| Panzer Dress | Females | 182 | 15 | - | Untouchable (¥34,300) |
| Egoist Shirt | Unisex | 183 | 9 | +Resist Brainwash | Untouchable (¥35,000) |
| Glaring Cape | Females | 187 | 14 | +Resist Dizzy | Untouchable (¥38,800) |
| Measure Collar | Cats | 188 | 21 | - | Untouchable (¥32,200) |
| Brave Waistcoat | Males | 192 | 12 | +Resist Fear | Untouchable (¥35,200) |
| Old Pure Collar | Cats | 190 | 20 | Lu+1 | Wash Sooty Horn |
| Old Tights | Females | 194 | 17 | En+1 | Wash Sooty Grifter's Garb |
| Fluted Guard | Males | 201 | 13 | - | Untouchable (¥35,000) |
| Gambler's Shirt | Males | 206 | 12 | Lu+5 | Locked chest - House of Darkness |
| Old Vest | Males | 206 | 12 | St+1 | Wash Sooty Spotted Fur |
| Lucky Robe | Females | 210 | 18 | Lu+5 | Electric Chair Execution - Fortuna |
| Super Lucky Robe | Females | 220 | 18 | Lu+10 | Electric Chair Execution - Fortuna(fusion alarm) |
| Pure Collar | Cats | 224 | 20 | Lu+6 | Wash Sooty Horn |
| Divine Black Tights | Females | 228 | 17 | En+6 | Wash Sooty Grifter's Garb |
| Leopard Print Vest | Males | 243 | 12 | St+6 | Wash Sooty Spotted Fur |
| Accessory | Effect | Location |
|---|---|---|
| Ring of Greed | President's Insight | Have Jose upgrade the Crystal of Greed. |
| Crystal of Envy | Masukukaja | Collect all Will Seeds in Niijima's Palace. |
| Orlov | High Counter / En+3 | Electric Chair Execution - Orlov |
| Orlov R | High Counter / En+5 | Electric Chair Execution - Orlov(fusion alarm) |
| Black Headband | Mana Surge / St+5 | Electric Chair Execution - Magatsu-Izanagi |
| Black Headband R | Mana Surge / St+8 | Electric Chair Execution - Magatsu-Izanagi(fusion alarm) |
| Spiral Nuclear Ring | Mafreila | Electric Chair Execution - Ananta |
| Reactor Ring | Freidyne | Electric Chair Execution - Ananta(fusion alarm) |
| Spiral Snow Ring | Mabufula | Electric Chair Execution - Byakko |
| Blizzard Ring | Bufudyne | Electric Chair Execution - Byakko(fusion alarm) |
| Spiral Curse Ring | Maeiga | Electric Chair Execution - Pazuzu |
| Hex Ring | Eigaon | Electric Chair Execution - Pazuzu(fusion alarm) |
| Kugelbein | Auto-Maraku / En+5 | Electric Chair Execution - Red Rider |
| Kugelbein R | Auto-Maraku / En+8 | Electric Chair Execution - Red Rider(fusion alarm) |
| Hallowed Ring | Hamaon | Electric Chair Execution - Kushinada |
| Spiral Hallowed Ring | Mahamaon | Electric Chair Execution - Kushinada(fusion alarm) |
| Black Moon | Apt Pupil / St+5 | Electric Chair Execution - Tsukuyomi |
| Black Moon R | Apt Pupil / St+8 | Electric Chair Execution - Tsukuyomi(fusion alarm) |
| Triple Shot Belt | Triple Down | Electric Chair Execution - Seth |
| Special Shot Belt | One-shot Kill | Electric Chair Execution - Seth(fusion alarm) |
| Spiral Karma Ring | Mapsio | Electric Chair Execution - Mishaguji |
| Mystic Ring | Psiodyne | Electric Chair Execution - Mishaguji(fusion alarm) |
| Miracle Belt | Miracle Punch | Challenge Battle (Trial Lv.50, 46,000 pt.) |
| Spiral Idaten Anklet | Masukukaja | Challenge Battle (Survival, 70,000 pt.) |
| Heat Riser Anklet | Heat Riser | Challenge Battle (Survival, 90,000 pt.) |
| Debilitate Anklet | Debilitate | Challenge Battle (Trickster, 450,000 pt.) |
| Ardhanari Band | Blazing Hell | Challenge Battle (Full Moon Lv.50, 60,000 pt.) |
| Thunder Charm | Wild Thunder | Challenge Battle (Foggy Day Lv.50, 1,200,000 pt.) |
Search Objects[]
Treasure Chests[]
Shops[]
Members Floor Lobby[]
| Item | Price | Stock | Description | |
|---|---|---|---|---|
| Quantity | Restocks | |||
| Bead Chain | 120 coins | 1 | - | Fully restores HP to all allies. |
| Soma | 350 coins | 1 | - | Fully restores HP and SP to all allies. |
| High Limit Card | 50,000 coins | 1 | - | Allows access to the High Limit Floor of Niijima's Palace |
High Limit Counter[]
Enemies[]
5716 | 5717 | 5718 | 5719 | 5720 | 5721 | 5722 | 5723 | 5724 | 5725